
When one starts to manage too many hosts, i.e. a number of Raspberry Pi machines, ssh-ing to each one and introducing the password every time is ugly for a lazy ass like me.
In this short article I'll explain how to set up the Key Authentication between hosts, initially from Mac to Linux, but works for mostly all.
Overview
Here is the list of actions that we'll do:
- Explain what is a SSH Key pair
- Create a SSH Key pair for our local (client) computer
- Set the local's (client) computer public key into the remote (server) computer
- Test the connection
1. What is a SSH Key pair
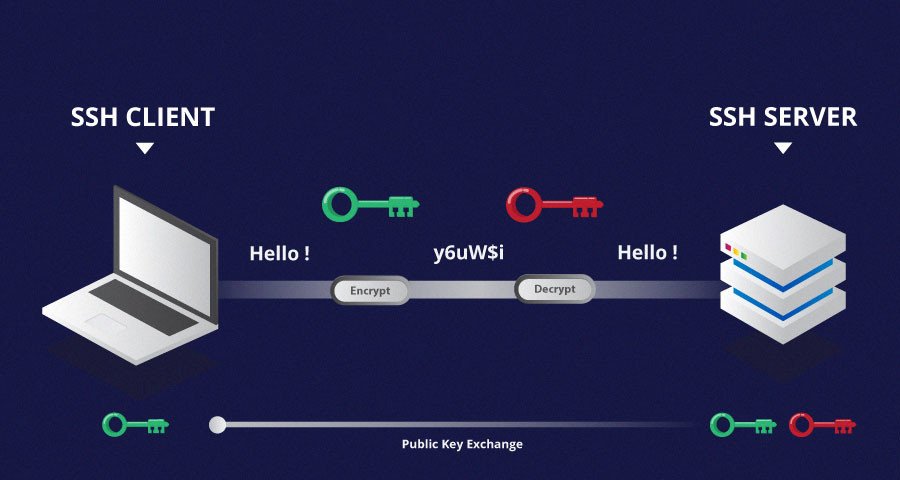
As stated by the Wikipedia, the SSH stands for Secure Shell Protocol and it's a network protocol that allows us to connect a SSH client to a SSH server and interoperate with it in a session as we would be connected physically there.
It is very used for developers, devops and system administrators in a daily basis to connect to their hosts and manage network and internet services. It is also used by applications to connect to a host and execute any task, so it is important to keep a minimum level of security.
This security is granted by several strategies. The most common and default is the user/password granting: one connects to a server and gets prompted for a user and a password.
There are other strategies that intend to grant more security (and commodity), for example the authentication per keys. Quoting the wikipedia:
SSH may be used in several methodologies. In the simplest manner, both ends of a communication channel use automatically generated public-private key pairs to encrypt a network connection, and then use a password to authenticate the user.
When the public-private key pair is generated by the user manually, the authentication is essentially performed when the key pair is created, and a session may then be opened automatically without a password prompt. In this scenario, the public key is placed on all computers that must allow access to the owner of the matching private key, which the owner keeps private. While authentication is based on the private key, the key is never transferred through the network during authentication. SSH only verifies that the same person offering the public key also owns the matching private key.
Summarising, the client's public key needs to be registered in the server so that when the connection is established the server can check that it can trust the client and grant access without password.
2. Create our client's SSH Key pair
So we know that we need to create the Key pair for our computer. This process will depend on which operating system your computer has but will end in the same outcome.
Different encryption algorithms
At the end of the day, we're talking about security. There are different algorithms that we can use to generate our keys. Some are stronger than others, some are faster than others. I'd recommend this article to get a deeper idea of each, hoping to help to choose which one to use when generating our keys:
Long story short, I am going to assume that our decision is to use EdDSA.
Generate the SSH Keys in Windows 10/11
I must say that I haven't used Windows as a main setup for the last 15 years. I remember that it was not a big deal back in the days with PuTTY and PuTTYgen, but doing a quick search for this article I saw that things have evolved a bit and I prefer to defer the explanation to other articles:
Generate the SSH Keys in Mac OS / Linux
Here both operating systems behave the same:
-
Open a terminal and type the following:
$ ssh-keygen -t ed25519With this we're stating that we want to use the
edDSAalgorithm to generate our keys. It will prompt several questions: -
Enter file in which to save the key (/home/xavier/.ssh/id_ed25519):-> Leave blank. We're accepting to save the files in the default path, which is good. Just a note,xavieris my user, you should have yours here 😉 -
Enter passphrase (empty for no passphrase):-> Leave blank. We're not introducing any passphrase. This is because we actually want to get rid of having to remember / introduce passwords, and having a passphrase-free key pair allows to simplify processes likersyncwhen we want to automatise backups, for example. But yeah it is a risk, encrypting a key with a "random" passphrase is an extra layer of security. You can read this article here and get your own opinion. -
Enter same passphrase again:-> Leave blank. Just a typical "type it again" measure to avoid typos in blind passwords
And it outputs something similar to this:
Your identification has been saved in /Users/xavier/.ssh/id_ed25519
Your public key has been saved in /Users/xavier/.ssh/id_ed25519.pub
The key fingerprint is:
SHA256:s2UEqmGYMKoF8+fCA276q4zTZIA45HKjX3QKLmGnio xavier@endor.local
The key's randomart image is:
+--[ED25519 256]--+
|=       .        |
|.* o   . .       |
|o * * ... .      |
|o* * +   .       |
|**X +  .S o      |
|@==  .   =       |
|**. .   .        |
|E+.              |
|*+o.             |
+----[SHA256]-----+
Show them to me
You're curious, eh? Just move to your home folder and type the following:
$ ls -l .sshYou'll get something like the following:
total 56
-rw-r--r--  1 xavier  staff    48 Feb  4 06:49 config
-rw-------  1 xavier  staff   525 Jan 26 16:53 id_ecdsa
-rw-r--r--  1 xavier  staff   190 Jan 26 16:53 id_ecdsa.pub
-rw-------  1 xavier  staff   411 Feb  4 08:17 id_ed25519
-rw-r--r--  1 xavier  staff   100 Feb  4 08:17 id_ed25519.pub
-rw-------  1 xavier  staff  1901 Jan 28 08:06 known_hosts
-rw-------  1 xavier  staff  1731 Jan 28 08:06 known_hosts.old
The id_ed25519 file is your private key and you must keep it always secure. As long as it never leaves your computer it's fine. The id_ed25519.pub is the public key, the one that you'll share to the remote computers so that they can validate that you is you.
Here you can see that last week I created also a key pair with ECDSA... and while doing this article I realised that it's not thaaat secure.
Set our public key into the server's host
Now what we want is that the server trusts us with our public key.
-
First of all you need to copy your actual public key in the clipboard. Just show the content of your public key file, select it and copy it (all the line):
$ cat ~/.shh/id_ed25519.pub ssh-ed25519 AAAAC3NzaCABCDESAAAAIHzcLKJRy6123456788990OsirJL5fcG6n6fKk0TRq8qc xavier@endor.local -
Now we need to SSH into the remote machine. In my case is called
alderaan(yes, I am not using the IP, as I have now a DNS server in my local network) and I am using a short form to log in there by defining which user I want to use in the remote host (which is my userxavier):$ ssh xavier@alderaan -
Of course, it still asks to type the password. Type it.
-
Now create a new file in the
.ssh/folder in your home calledauthorized_keysby editing it:$ nano ~/.ssh/authorized_keys -
Paste here the content of your clipboard. It should generate one line with the content of your public key.
-
Save (
control + o) and exit (control + x)
At this point your key from your client's computer is set up in the remote (server) host. We can leave the host:
$ exitTest the connection
So new let's ensure we did the process correctly. In you client computer, try to SSH to the remote host one more time:
$ ssh xavier@alderaanAnd should directly leave you with the $ of the logged prompt without asking you for a password.
Wrapping up
This whole article is meant to short cut a lot of your time while entering into every single machine in your network. In my case there are some Raspberry Pi doing some work here and there, and it's very practical to avoid having to type the same password again and again. Also, it helps to set up automatic processes like backups with programs like rsync, that otherwise would be quite complex to workaround the human intervention.