In the previous article I explained all the way to get customized templates into your Remarkable 2. That is of a great use and our productivity really boosts, but our eyes also need some food. What if I tell you that the boring "starting", "rebooting", "powered off" and "sleeping" can also be customized? Cool right?
Here I will go through the process of customizing one of them as the example. I will assume that you went through the previous Remarkable 2 article so that we already have our Remarkable 2 as a host and it knows our computer as it has our authorisation keys.
Steps overview
- Get the current screen images to get an impression
- Create our own screen
- Install our own screen
Get the current screens from our Remarkable 2
The process is similar as for the templates. In this case, the screens live in the path usr/share/remarkable. So, in our computer:
- Create and move ourselves to the destination folder
$ mkdir -p $ ~/tmp $ cd ~/tmp - Copy the suspended screen image file from the device to the computer
$ scp root@remarkable:/usr/share/remarkable/suspended.png .
And with this we have the file in our computer and we can take a look at it. We have also the following files available to retrieve:
factory.png: The screen you see the first after starting the devide for the first timeoverheating.png: The screen that appears when the device is too hot and automatically halts for security reasons.poweroff.png: The screen that is shown while the device is shut down.rebooting.png: The screen that is shown while the devide performs a reboot.starting.png: The screen that appears while the device is loading. It adds a small progress bar a little bit below the middle of the screen.suspended.png: The screen shown while the device is suspended.
Create your own screen
Again, this is highly creative and depends on your own skills (or your capacity to find other resources online), so I will leave this to you. Still, a consideration:
Width and Height
As explained in the previous article, the size of a Remarkable 2 page is 1404x1872 in portrait mode, and the screens are meant to be in portrait mode. You can of course create a screen in landscape, but when the device finished starting or comes back from suspension, it will be in portrait mode.
Create the screen
- Open GIMP and create a new file with the defined sizes (see above) and a white background.
- Be creative here. You can get a picture of yours, convert it in greyscale, paste it in the screen and call it done.
- Export the file as PNG (somewhere you can relate to afterwards from the terminal, for example in your ~/tmp folder)
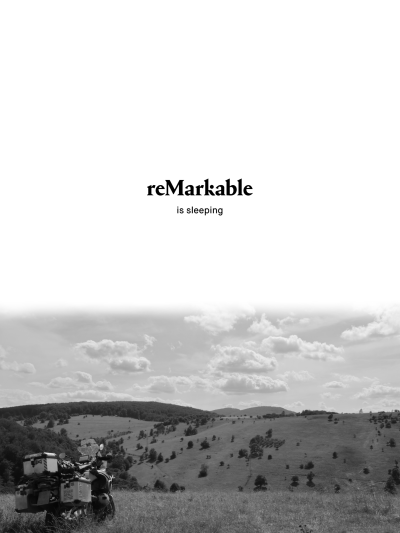
And that should be it. As an example, I leave here the file I created for the suspended screen, by pasting an image and moving the message a bit up.
Install your own screen
This is a bit simpler than with the templates: In this case you don't need to specify these files in any JSON file, just copy them overwriting the previous file and restart:
- Copy the file to the required location:
$ scp ~/tmp/suspended.png root@remarkable:/usr/share/remarkable/suspended.png - Log in into your Remarkable 2
$ ssh root@remarkable - Restart your Remarkable 2 so the changes take effect
$ systemctl restart xochitl
At this point, every time that you press the physical button on the top to suspend your Remarkable 2, a new customized image will appear into the screen!


