
Should be no surprise at this point that I like to work with wood. Actually, I love to make my own stuff and wood simply has a great value return for money and effort investment (oh please stop that!). As my GF and me like to play board games, I decided to build one of the first games I liked when I was a child, Othello, and have it done for Xmas.
Disclaimer
I am no wood worker. I just like to cut & nail pieces like I was doing Lego when I was a child. After some time I got some tips and tricks but I am no more than an amateur. The ideas usually fit in my head and when I execute them I realise that I don't have the correct tool or I didn't think in this or that point, that all wood workers know by heart. Just go easy with me 😊
Overview
This article is meant to log my project of creating a hand made Othello board game. I separated the article in the following chapters:
- The Othello game
- Planning the build
- Building the board
- Building the chips
- The game is finished
- Improvements I'd do the next time
1. The Othello game
Othello is a board game that plays with chips over a 8 x 8 grid. You can read the rules and some story of the game here. It is also known as Reversi, and you can find plenty of plastic versions to buy quite cheap.
2. Planning the build
So the game has 3 main parts to be built:
- The board itself: just a one-pice wood with an extra frame
- The fabric part of the board: we want to play over a nice surface
- The chips to play over the board
In my head, the whole project is quite simple: I will cut a square of wood, place a fabric above to feel nice, and buy a round stick of 1 meter or so that I will cut in small pieces and paint them accordingly. As you may imagine, it is easily said than done, but that's a story for later.
The first thing is to make some numbers for the sizes, and then I quickly realized that it all depends in the diameter of the chips. So I will start with the chips and relate everything after it
2.1. The chips
On the paper is easy: I went to the closest Baumarkt I have and I got a 1 meter stick with a round cut of a little less of 3 cm of diameter. I did not really calculate the amount that I needed, because at that point it felt more like a "yeah, I start with this and let's see". So for posing some numbers:
- (0,5 cm high per chip + 0,3 cm width of the saw blade) x (64 chips + 5 spare chips) = 55,2 cms of stick
2.2. The wooden board
As I am doing other wooden projects at this point I just reused some spare pieces I had around. Here I did measure the space I should count on: Starting by the diameter of the chip, which is around 2,8 cm so I moved up to 3cm so numbers are round and I have some space to put my fingers to interact with them:
- (3cm diameter per chip x 8 positions) + (2 x 1cm of margin in the sides of the fabric) + (2 x 2cm for the wooden frame) = 30cm length
So how I have it in mind, it's 3 pieces piled up: the base is a thick square that brings the strength, the second floor is just a square frame that has the fabric there and the third floor is also a square frame that just closes everything nicely.
Then, I need:
- 1 x thick wood plate 30x30cm: I use Buche Playwood of 12mm
- 2 x thin wood plate 30x30cm: I use Bucke Playwood of 4mm
2.3. The fabric part of the board
As we calculated above, it's a square of 26x26 of fabric that I intend to glue over a same size of thin playwood and fit it into the board in the frames. It will thake the space of the second floor.
I went to a local fabric store and bought plush, that gives this texture of a green poker surface, but in grey.
3. Building the board

Once the numbers are done, the next steps are quite easy here:
- Cut the 12mm 30x30cm playwood for the base
- Cut the 4mm 30x30cm playwoods with the 26x26cm hole inside for the frames
- Cut the 4mm 26x26cm playwood for the base of the fabric
- Polish edges
- Glue the pieces together
- Polish the edges again
- Lack with your favorite color (or transparent)
When it comes to the lack, we have the Bauhaus' 1417 Honey color lack that we're using for the van furnitures and looks great with the Buche Playwood. We usually give 2 hands to it.
... and don't forget about the fabric, great to do while waiting for the lack to dry out:
- Cut a 26x26cm square from the fabric
- Measure and draw the grid with a black Stabilo pen (make sure you do a 1 pass line, otherwise there is too much ink in a given point and looks ugly)
- Glue the fabric to the 26x26cm piece

Regarding the gluing of the fabric, I had the experience of previous projects that too much glue makes the fabric to become hard, with a plastic-ish haptic, or having the glue appearing through the fabric. I applied here the glue with a piece of carton like as a pincel, just to feel the wood "wet by the glue", avoiding big chunks of glue. Also, ensure that you apply also in the edges of the wood to avoid the fabric to wave up.
4. Building the chips
Ah, here it was hell. I clearly underestimated this part. In my head it was just cut and paint, but in reality it was not going to be that simple.
4.1. Cutting the chips

I am lucky and I have a miter saw that easies the process quite a lot. It also produces not a very smooth ending if the wood does not have enough consistency (pine wood may break apart in the edges when cutting)
Still, best way I found was to mark in the stick the high of the chip, then the width of the saw blade, then the high of the chip, then the width of the saw blade, ... so I could draw once and cut once, which takes away a lot of hassle of draw-cut-draw-cut constantly.
4.2. Polishing the chips

Here I focused on the rough edges that the saw did, trying to make them smooth
4.3. Painting the chips
And here the party starts. I thought that I could spray the chips, that it would be fast and easy. Well, it was: I placed all the chips over a newspaper and sprayed the white color. I had to apply like 4 hands so I eventually used the whole spray pot... seems like the wood was thirsty!

Then I took all the pieces and discovered that the amount of ink that dropped down the piece fit also below it... I could foresee this happening again with the black ink of the other side and I decided to raise up the chips by using this painter's paper tape. It should cover the sides and in case the ink flows in between, it may keep going down through the paper without marking the down side of the chip. It worked 😊


So also several hands of ink again to the chips

4.4. Covering the sides of the chips
When removing the painter's paper tape I discovered that even I avoided to fuck up the white side with black ink, the sides were quite ugly, with a picasso of white and black that didn't look good. My girlfriend and me explored some solutions like nails lack but we discarded due to the amount of lack to apply and the not nice ending it leaved.
She came up with these DIY strap paper rolls she had, that once cut in the width needed, would glue and fit nicely around the chip. Great, then to like 70 of them 😅
4.5. Lack the chips with transparent lack

While covering the sides we realized that the black ink from the spray was leaving residual ink into our fingers. That could make permanently dirty the board fabric, which is obviously undesired. We got the idea to use the waterproof-outside-transparent lack that we used for the van's sink furniture to give a hand on them and therefor avoid that the chips make dirty anything. It also has the side effect of helping the side strap to stick together with the chip.
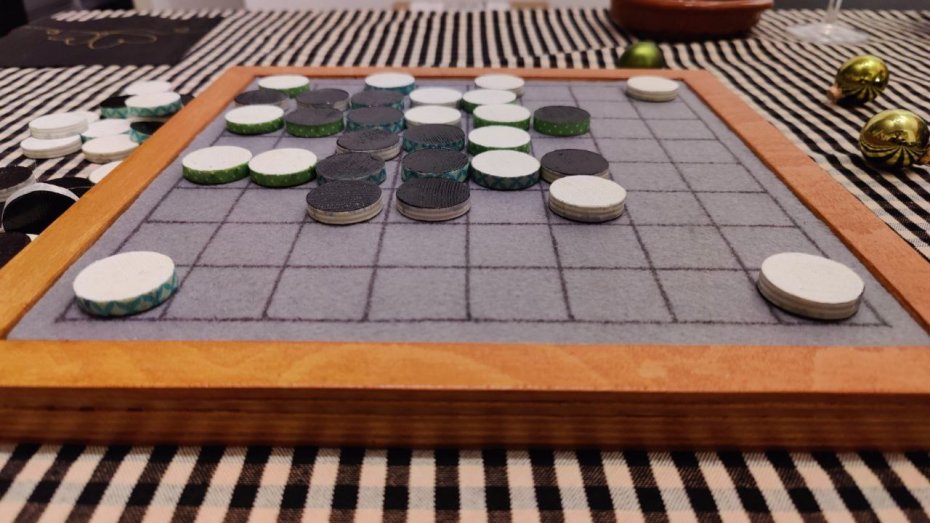
5. The finished game
So we made it! It was ready to play our first game the Xmas night. It was supposed to be a present from me to her but if she wouldn't help me I wouldn't be able to finish it nor finish it in time. So was specially enjoyable these first games we did after dinner.

I mush say that leaving apart the amateur execution and my null abilities to cut straight lines in the wood, the board looks great and the pieces have the right size. The side straps are cool and the trick of the transparent lack worked pretty well.
6. Improvements I'd do the next time
I don't want to finish this article without reflecting a bit the outcome, and pointing out what I would have done different if I would do the project again.
Spend more time polishing
Yes, I need to learn more about polishing: the different sizes of the grain, and how to get a nice ending. Even with the transparent lack, the chips have a raw touch, not really soft. I guess that caring that the edges are not sharp is not enough.
Use less wood for the board
The idea of 2 frames over the base, where the first floor will allocate also a boot with the fabric inside was a totall overkill. I could have done just one frame and glue the fabric directly over the base. The board feels heavy and unnecessary bulky, not that you care too much when it's already over the table. I was scared to do a mistake with the fabric, as previous experiences didn't work pretty well with fabric, things painted over the fabric, and then it glued over a wood.
Make the chips 1mm less high
The sizes of the chips are great, but 1mm lower (making it 4mm) or even 2mm lower wouldn't hurt. They feel a bit too high and contribute to make the overall prject a bit heavy.
Wrapping up
I love to work with wood. Did I say it already? Usually the problem is to not have the proper tools, but still, it's a material that allows you corrections and also the imperfections don't look too bad. It's a warm material, with beautiful wave patterns, and looks great anywhere you place it.
So I did another board game in wood, and got new learnings for the next ones. Enjoy playing!