Recently I saw again one of my #RaspberryPi hosts freezing and needed a physical restart while I was away. This is the only topic that worries me about #self-hosting, as I am not always next to the hosts when they fail (that does not happen that much).
This time I received the tip from @Cassman@mastodon.social that triggered a test and this article about the built in #Watchdog!
Overview
This article explains how to set up the Watchdog service in a Raspberry Pi. I’ve followed the instructions from this post in Diode.io and change it according to my tastes (I prefer to play with the original configuration file rather than just add repeated parameters).
What we’ll need to do is:
- Enable hardware support for watchdog
- Install the watchdog system service
- Configure the watchdog service
- Enable and start the service
- Test that it works
- Wrapping up
0. Requirements and assumptions
- This article is done over a Raspberry Pi 4 8GB called
tatooineand running a non-root user calledxavi. - This Raspberry Pi was installed following my previous article Spawning a Raspberry Pi 4 with Raspberry Pi OS. It is also up to date by following the recent article Upgrade Raspberry Pi OS from 11 Bullseye to 12 Bookworm.
1. Enable hardware support for watchdog
-
Change to the super-user, as the next command can’t be run with sudo.
sudo su -
Add the watchdog parameter into the booting configuration
echo 'dtparam=watchdog=on' >> /boot/config.txt -
Reboot the machine, we’re already in super-user mode
reboot
2. Install the watchdog system service
-
Update the system
sudo apt-get update -
Install the service
sudo apt-get install watchdog
3. Configure the watchdog service
Now we have a file in /etc/watchdog.conf that holds the configuration of the service. By default, all interesting parameters are commented out, so we’ll uncomment some and change some values.
-
Edit the configuration file as a super-user
sudo nano /etc/watchdog.conf -
Uncomment the following lines:
watchdog-device = /dev/watchdog
watchdog-timeout = 60
max-load-1 = 24
As a quick explanation:
watchdog-devicedefines which is the watchdog devicewatchdog-timeoutdefines the seconds to wait for the frozen system before rebootingmax-load-1defines the load (24) to reach over one (1) minute as a threshold to reboot. A load of 24 of one minute means that you would have needed 24 Raspberry Pis to complete that task in 1 minute.
-
From the uncommented line
watchdog-timeout = 60, change the60to15 -
Save and exit.
4. Enable and start the service
-
Enable the service
sudo systemctl enable watchdog -
Start the service
sudo systemctl start watchdog -
Check if the service is running successfully
sudo systemctl status watchdogThe output will be something like:
● watchdog.service - watchdog daemon
     Loaded: loaded (/lib/systemd/system/watchdog.service; enabled; preset: enabled)
     Active: active (running) since Mon 2024-01-15 09:47:19 CET; 2s ago
    Process: 2230 ExecStartPre=/bin/sh -c [ -z "${watchdog_module}" ] || [ "${watchdog_module}" = "none" ] || /sbin/modprobe $watchdog_module (code=exited, status=0/SUCCESS)
    Process: 2231 ExecStart=/bin/sh -c [ $run_watchdog != 1 ] || exec /usr/sbin/watchdog $watchdog_options (code=exited, status=0/SUCCESS)
   Main PID: 2233 (watchdog)
      Tasks: 1 (limit: 8755)
        CPU: 22ms
     CGroup: /system.slice/watchdog.service
             └─2233 /usr/sbin/watchdog

Jan 15 09:47:19 tatooine watchdog[2233]:  interface: no interface to check
Jan 15 09:47:19 tatooine watchdog[2233]:  temperature: no sensors to check
Jan 15 09:47:19 tatooine watchdog[2233]:  no test binary files
Jan 15 09:47:19 tatooine watchdog[2233]:  no repair binary files
Jan 15 09:47:19 tatooine watchdog[2233]:  error retry time-out = 60 seconds
Jan 15 09:47:19 tatooine watchdog[2233]:  repair attempts = 1
Jan 15 09:47:19 tatooine watchdog[2233]:  alive=/dev/watchdog heartbeat=[none] to=root no_act=no force=no
Jan 15 09:47:19 tatooine watchdog[2233]: watchdog now set to 15 seconds
Jan 15 09:47:19 tatooine watchdog[2233]: hardware watchdog identity: Broadcom BCM2835 Watchdog timer
Jan 15 09:47:19 tatooine systemd[1]: Started watchdog.service - watchdog daemon.
5. Test that it works
I tried something called fork bomb. So, once we’re still ssh-ed into tatooine, paste the following command:
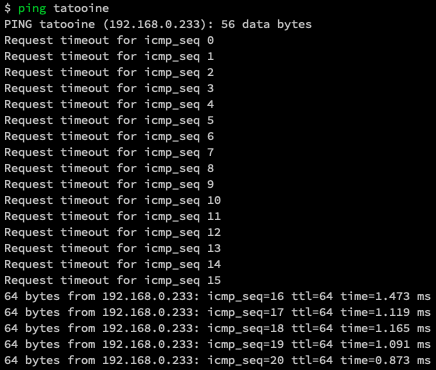
sudo bash -c ':(){ :|:& };:'It feels that nothing happens, but in few seconds the terminal becomes slow and unresponsive. The connection got lost and I could not access. The ping from my local computer showed:

…and eventually I could connect back to the host as nothing happens. I checked what Grafana registered for the fork bomb test time period and showed:

It’s a success!
6. Wrapping up
So turns out that there is at least a way to keep the little Raspberry Pi machines online even if something goes wrong. Now I’m going to set this up in all RPIs I finally breath when I’m out in vacations, physically far from the hosts, so if they need a reset they can do so by their own.

